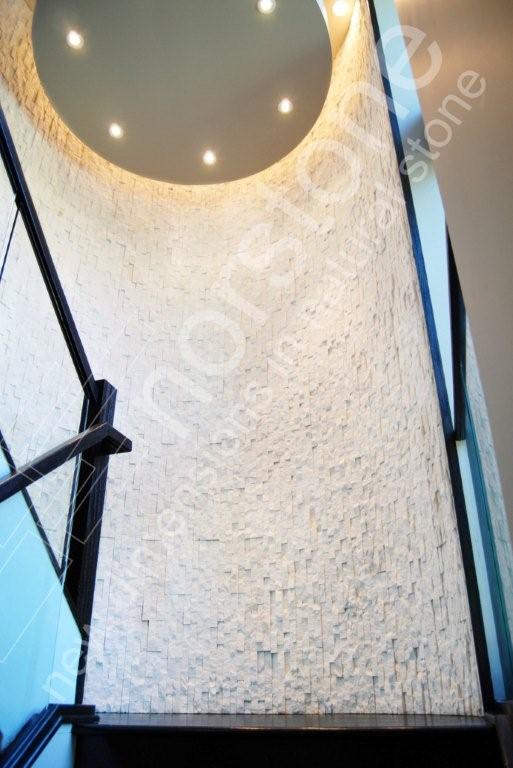
How To Install Stacked Stone On Curved Walls
One of big things that makes our stacked stone rock panel products so easy to work with is that its already been pre-assembled into a highly calibrated ready to install unit, that is more comparable to tile than to traditional loose hand stacked stone. The panel system provides a lot of benefits, chief among them the ability for less skilled labor, including DIY installation of stacked stone by homeowners. One of the drawbacks of the panel system is the lack of flexibility of the panel, in particular when working on curved or radius walls. However, there are lots of great ways products like ours can be used on curved walls, so let’s take a look at our guidelines for using stacked stone on radius walls.
Step 1: Know the Radius of Your Wall
The first step in understanding if a stacked stone tile will work on a curved wall is to know what the actual curve,or radius of the wall is. Radius is actually a unit of measure, normally given in feet, and expresses the length from the middle of a circle to the edge. In other words, if you took a curved wall, and extended that curve out using an imaginary line to complete a full circle, the radius measurement would be how far it is from the center of the circle to any point on your wall.
If you’re working with a set of construction documents or blueprints, the radius is often called out, or can be calculated via many CAD programs. If you’re retrofitting an existing wall with stacked stone you can tie a string between the two ends of the curved wall, measure the length of the string and the farthest point between the string and the wall, and using your high school trigonometry, or more likely one of many easy to use online calculators, calculate the radius.
Our rule of thumb is that any wall with a radius of 20 feet or greater can use our rock panel products without modifying the product. For walls with radius measurements less than 20 feet, multiple options are explored below.
Step 2: Understand Installation Techniques
For walls with radius measurements less than 20 feet the primary methods for making stacked stone panels “fit” is to either cut down the panel into smaller sections and / or cut the edges of each panel for a tighter fit.

Norstone Rock Panels have a standard orientation of 6” tall x 24” wide, so the first step when working on a radius wall less than 20 feet would involve cutting the panels in half (6”x12”). This introduces twice as many vertical seams into the job which allows the tile to be more flexible along a curved wall since most of the curve is accommodated where two panels come together.
In addition to cutting the the panels down in size, the vertical edges can be cut with a miter saw to come together more tightly along a tightly curved wall. This takes the right tools, and some skill and patience, but when done correctly on tight radius work like stacked stone pool and spa surrounds, the results are amazing. The garden wall in the photo above was installed personally the CEO of a major tile distribution company in Florida who has a lifetime of tile setting experience, and who personally attested to the ease of installation of Norstone stone panels in radius applications.
Step 3: Understand Convex vs Concave
An important part of installing stacked stone on a curved wall is knowing if the stone is going on the convex or the concave side of the curved wall. Convex means the surface curves outward while concave means the surface curves inward. When working on a concave wall, the front of the stacked stone panels are going to be the tightest and potentially need some careful trimming for a precise tight fit. Convex is just the opposite in that the back of the panels might need trimming for a clean fit.
Step 4: Consider Alternatives
If you have a wall with a tight radius, but absolutely love the look of stacked stone in the space, the one alternative we see many clients go with is flipping the orientation of the panel to 6” wide and 24” tall. While this definitely changes the look of product, accentuating the long linear feel vertically instead of horizontally, the 6” width of the panel allows for a far more flexible installation. Don’t be afraid to think outside the box with your next stacked stone installation!

Radius walls are in many ways a great design contrast to the traditional flat walls that stacked stone is commonly associated with, and could be a great feature in your next interior or exterior project. If you have specific questions about how stacked stone will install on your radius wall or even just need a little help getting started, contact us today and one of our team members, highly skilled in both design and technical expertise, can help out. Until then, keep an eye out for curved walls in your day to day and just think how much better they’d look covered in stacked stone!
.png)


